
Hey friends and family,
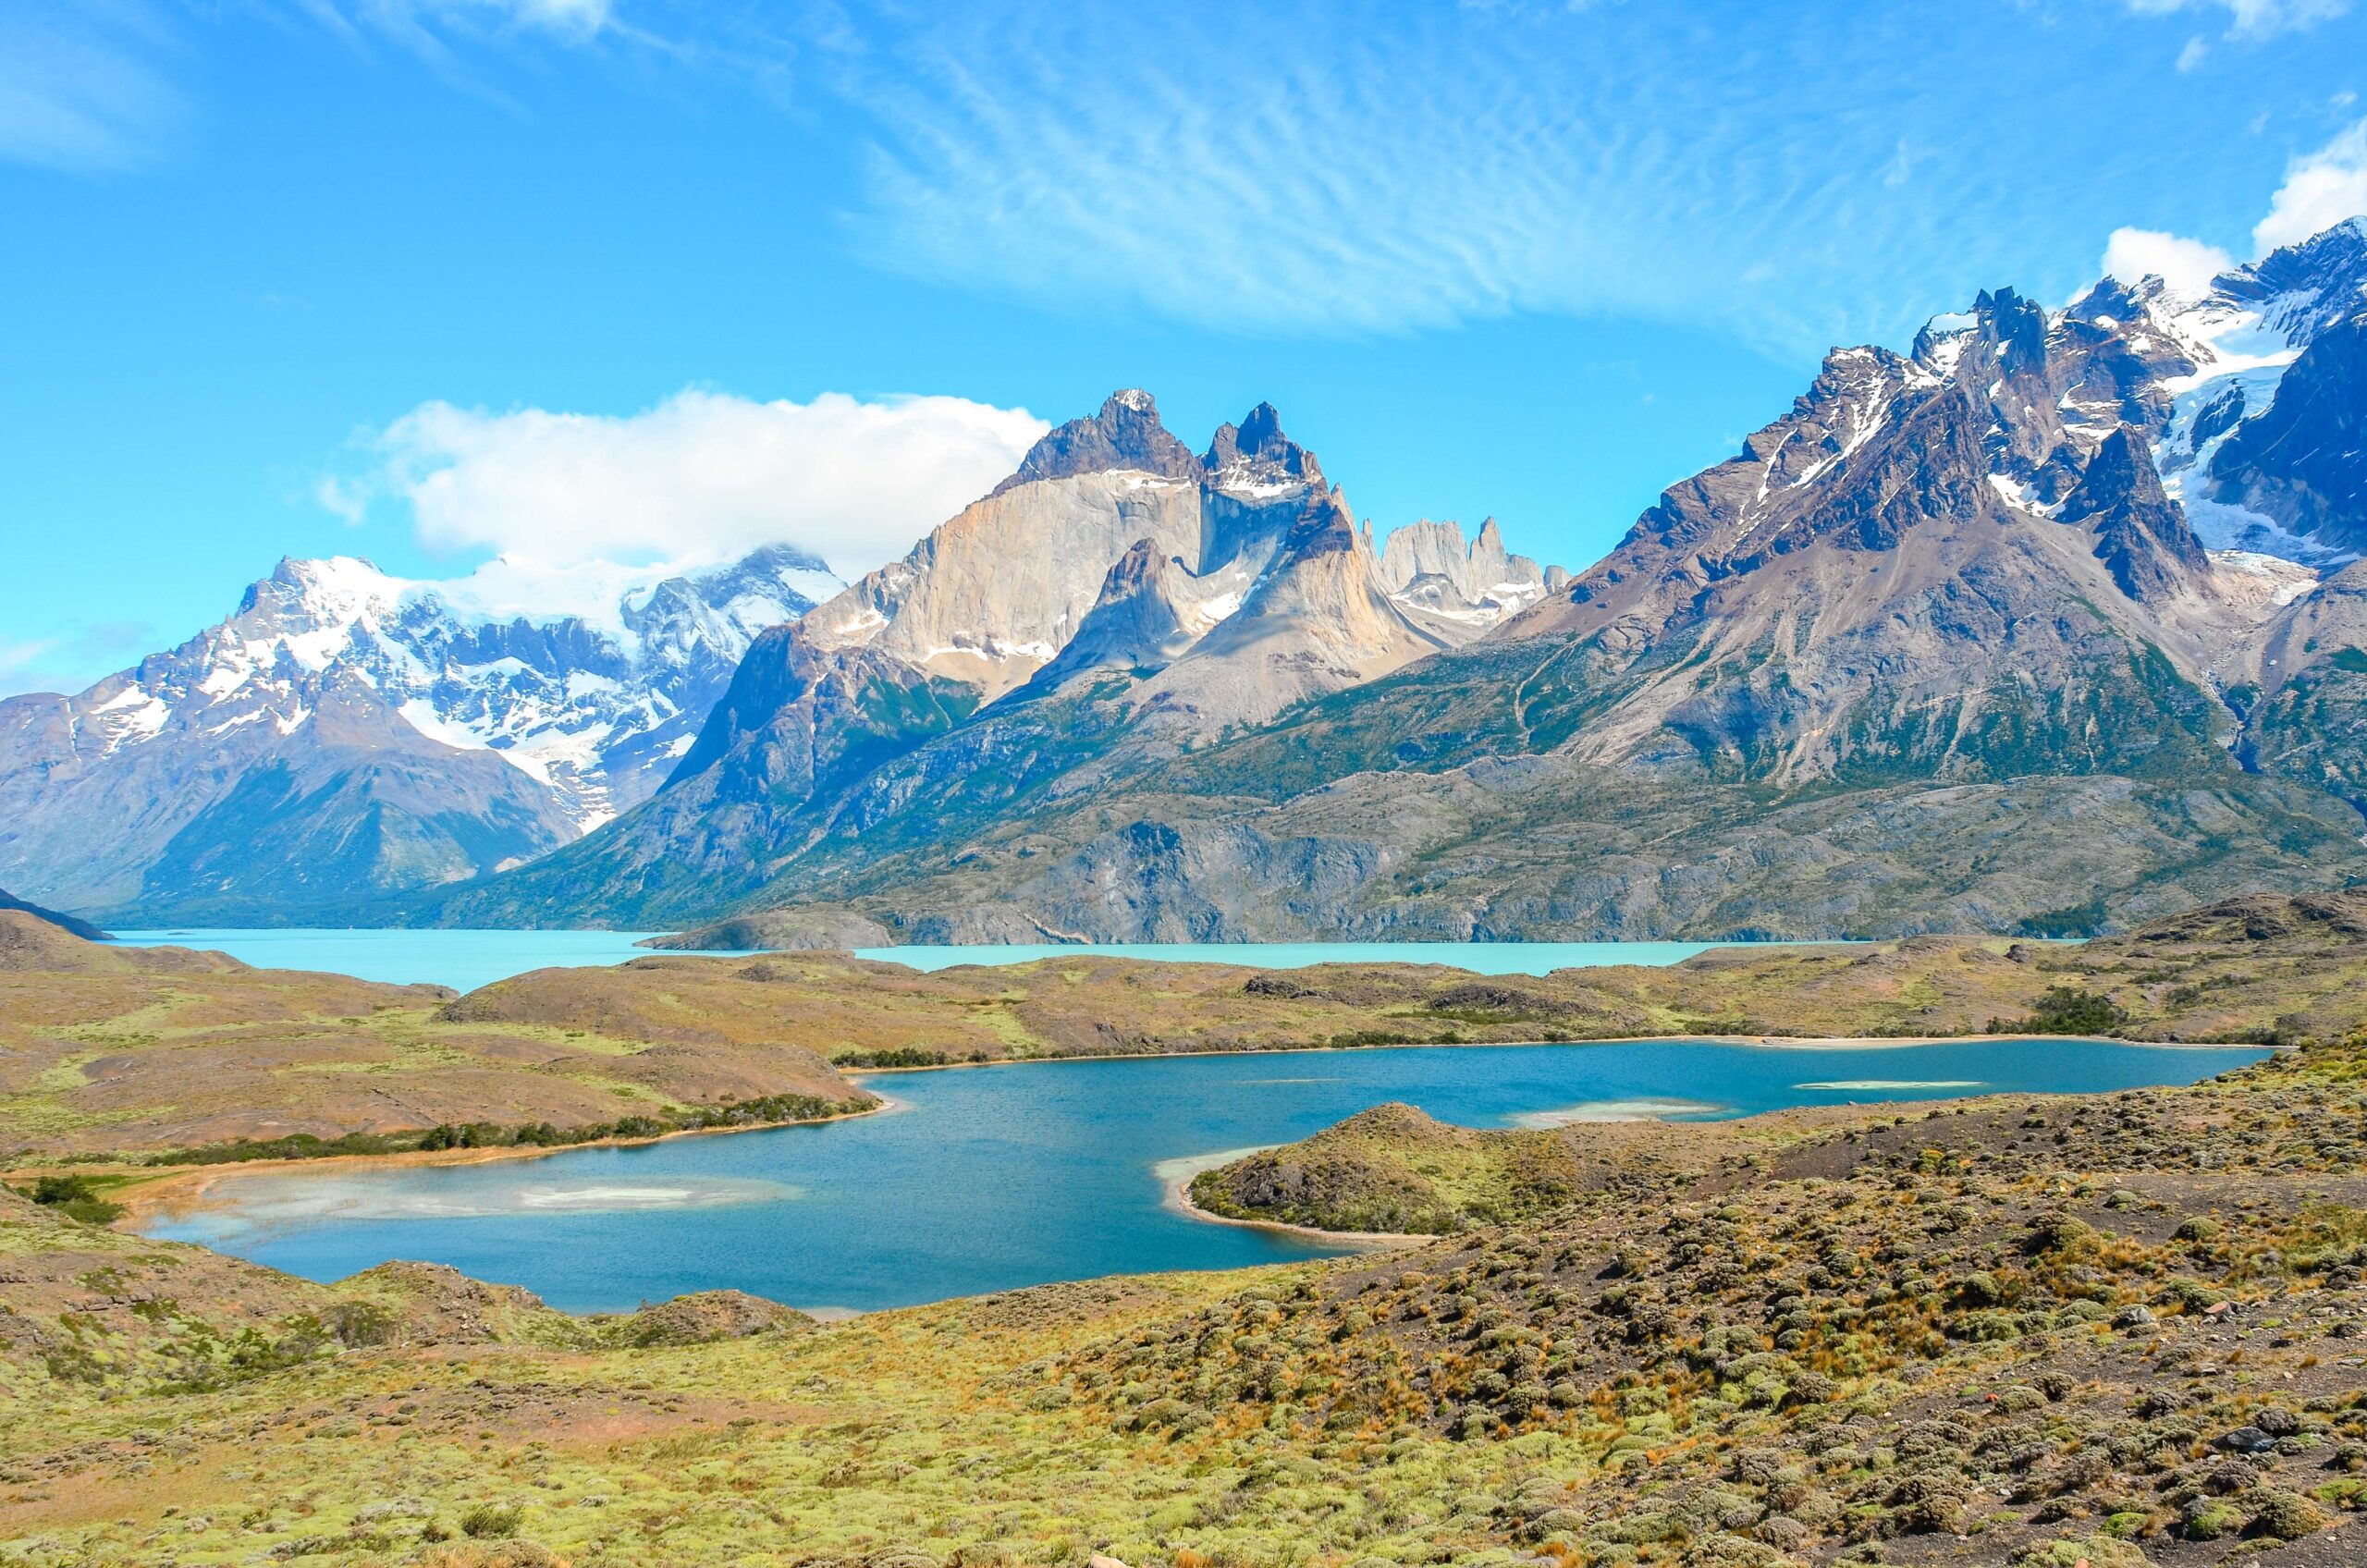
I (Perry) leaned hard into YouTube travel videos deep in the throes of the 2020 pandemic lockdown. Somewhere along the way, I watched The Bucket List Family’s trip to Torres del Paine National Park in Chile, and the jagged mountains and turquoise waters infected my soul. This was my mental image of what Patagonia looked like.
We had to go there.

So we did!
But what an adventure it was. Although Ushuaia, Argentina, and Puerto Natales, Chile are only 274 miles apart by air, they are nearly twice as far apart when traveling by land – a staggering 14-hour bus journey.
And if that wasn’t enough of an adventure, we followed it with a road trip and an 8-hour hike through the park itself.
Was it worth it?
On the Blog
Our blog this week includes two background articles on how we got to the start of our adventure in Torres Del Paine, Chile.
How to get from Ushuaia, Argentina, to Puerto Natales, Chile: A Review of Bus-Sur

Ushuaia, Argentina, and Puerto Natales, Chile, may look close together on a map, but the challenging terrain – including fjords and mountains – makes it a long road trip for travelers exploring Patagonia’s greatest highlights.
Moreover, flights between Ushuaia, and Punta Arenas, Chile, the connection point for flights and buses to Puerto Natales (the gateway to Torres del Paine National Park), ended in 2020 during the COVID-19 pandemic with no return announced.
This left us with one option to get from Ushuaia to Puerto Natales: the 12-hour bus, operated several times a week by Bus Sur.
We were pleased to find that Bus Sur operates a high-quality service with comfortable coaches and beautiful scenery. I’m shocked to say that even with the length, we would make this journey again. Here’s what you can expect.
How We Prepared for a 2-Day Hike in Torres Del Paine National Park

After logging many hours on board buses, we finally arrived in the town of Puerto Natales. This is the town that primarily outfits hikers and adventurers for their trips to Torres Del Paine national park, our next expedition into the massive Patagonia region. Here is where we began our preparations for the journey to Base Torres.
Perry and Pete’s Travel Diary
Torres del Paine: Three-Day Itinerary on a Budget
While planning our trip, we decided not to do the full “W” circuit or the full “O” circuit, which are very popular with visitors to Torres del Paine. These two world-famous treks are 5-10 day hiking/camping trips that particularly appeal to outdoorsy budget travelers.

We selectively did only the trek to Base Torres, the spot from where you can best view the Towers, as we weren’t sure that we were cut out for a full 5-day backpacking trip. This happens to be the most difficult, and somewhat dangerous, section of the circuits. This trek alone suited our needs and skill levels perfectly, especially since we split it across two days.
(The trek to Base Torres is a popular day hike and is serviced as such by Bus Sur, but we strongly advise against doing this hike in one day. It is very strenuous and we encountered several hikers who did not make it to the top. The hike took us about 10 hours total, including breaks.)
With only three days to see it all, we also opted to rent a car for our trip. Some buses service the main drop-off points for the W circuit, but we wanted to travel on our terms rather than the sometimes unforgiving bus schedules (which also skip some of the miradors, or lookouts, with the best views).
Ultimately, our itinerary looked like this:
- Day 1 – Picked up the rental car, drove from Puerto Natales to Torres Del Paine, parked at Refugio Torre Central, and hiked to Refugio Chileno. We stayed the night at Refugio Chileno.
- Day 2 – Hiked after breakfast from Refugio Chileno to Las Torres (the towers). Enjoyed the view and then hiked back down to Refugio Torre Central. We stayed the night at Refugio Torre Central.
- Day 3 – Drove from Refugio Torre Central to the other sites in the park, including Laguna Amarga, Los Cuernos, Mirador Salto Grande, and outside the park, Cueva Milodon. Returned the rental car and caught the last bus to Punta Arenas, Chile.
Day 1 and Day 2: Base Torres Hike
Rangers on Strike?
There was a lot of uncertainty leading up to our approach to the park. We had reserved our campsites, purchased our tickets in advance online, and picked up the rental car.
As it happened, there were rumors amongst hikers and online forums about the park rangers going on strike due to low wages. Reports varied from rangers simply allowing anyone and everyone entry with or without a ticket to the destruction of bridges to prevent safe access to Base Torres, the most popular hike. Others left cautionary tales about the lack of medical evacuation support if hikers were to become injured.
The die-hard adventurers on online forums reported that despite the obstacles and destroyed bridges, it did not stop them from fording every stream and climbing every mountain to get to where they wished. Naturally, this is not advised, but renegades are going to do what they are going to do.
Nevertheless, everything worked out just before we arrived. The strike ended, the bridges were intact, and we were able to drive to the parking lot without issue. We took our time moseying up the mountains to get to Base Torres.
Base Torres
At our leisurely pace, it took one day to drive to Torres del Paine National Park and hike to reach Refugio Chileno where we relaxed for the afternoon and stayed the night.

This was not an easy hike for us. It was the most challenging hike we have done in our many adventures.
Our hike started just as raindrops started to fall. We donned our raincoats but soon found that the temperature, combined with the steep trail, was too warm for a jacket. We could either be wet from our own sweat or wet from the rain – and we both opted for the rain.

We made it to Refugio Chileno after about 2.5 hours of hiking and hung our clothes up in our modest tent to dry before dinner. Thankfully, the clouds started to break so we could see the sunset.

The next day, we hiked up to Base Torres and then all the way back down to Refugio Torre Central near the parking lot.

The trail from Refugio Chileno to Base Torres is, among other things, poorly marked as you start to scale the steep sections of the mountainside. There are a number of misleading trails that can be treacherous. If it seems sketchy, it is likely not the correct path.
In case you’re wondering, yes, we ended up on one of those sketchy trails on our way up. We cursed all of our life’s decisions. It did have a nice view of the tree line.

Finally, we made it to the top another 2.5 hours later. The view is just as good as we hoped, but the photos don’t show how much wind was up there. We nearly blew over. It’s a miracle we managed to eat our picnic without losing it.

We stopped and had a beer and a Snickers bar, naturally, at Refugio Chileno on the way down. I think we earned it.
On our way back down, we encountered a meandering and exhausted pair of explorers along the trail. They were taking photos and we offered to take their photo together. They asked our thoughts about how long the trail would take to complete, and we noted that if they were already worn out after the short distance they covered, it likely wouldn’t be safe to proceed. One was visibly stressed from the earliest stage of the hike.
We informed them of some waterfalls visible from the trail a good 300 yards from their location if they wanted photos. I figured that was a worthy consolation prize as they were a sight to behold on their own. They took our advice, got their photos, and we saw them again at the Refugio Chileno an hour later.
The hike to Base Torres is not a hike for those who are not in good physical shape. On the other hand, there were a number of older adults hiking who made it look effortless. They swamped us up that mountain. Kudos to them.
You need to gauge your own fitness accordingly and know your limits. If you want to go gung-ho and tackle these multi-day treks in their entirety, you need to be prepared going in.

Finally, we continued all the way down to Refugio Torre Central. It was like hiking on a brand new trail – without the storm clouds, we could actually enjoy the views.

Day 3: Driving Torres Del Paine
Wildlife of Torres Del Paine
On day 3, after one of the best nights of sleep I’ve ever had in a tent (due to exhaustion, not comfort), we set out for our road trip through Torres Del Paine on our way back to town.
We purchased an excellent map of Torres Del Paine which had symbols marking the common whereabouts of various local fauna. As we approached Laguna Amarga I noted to Perry, unaware of the map’s finer details, that this is where we will spot Chilean flamingos. Perry thought I was kidding.

No, I was not. There were actual flamingos.
A short distance away we also spotted Guanacos, a cousin to Llamas and alpacas. These camelids have a shiftier look to them than some of their more domesticated relatives. They appear as though they would corner you in an alleyway and rob you of your wallet.

No one was foolish enough to try to pet a Guanaco… visitors to Yellowstone should take note. Don’t pet the wildlife.
Here can also be found Puma, a slightly smaller mountain lion than is typically found in Wyoming and much of the US. They are different variations of the same species and so could interbreed without issue if the opportunity came up (but we sure as heck hope it doesn’t). I say only slightly smaller. One of these could readily take on a human if needed, but the abundance of guanaco, flamingos, and other wildlife has made them simply wary of humans and occasionally curious. There are guided tours that offer better opportunities to see these felines; we blessedly missed them during our trip.
Los Cuernos and Mirador Salto Grande
We continued on down the pothole-laden road and took a look back at the mountains I had originally seen in the Bucket List Family’s video: Los Cuernos.

They are even more stunning in person.
Mirador Salto Grande, one of the larger waterfalls in the park, also does not require much more of a description. These photos speak for themselves.

Throughout our trip, we were struck by the various shades of blue we saw in the water. Some were bright blue, others turquoise, and the salty Laguna Amarga was a sickly seafoam green. There was such a large range. All were beautiful.

We often compared the scenery of Patagonia to Wyoming. They’re often very similar, but Wyoming cannot compete with the blue, blue waters.
Cueva Milodon
After a hazardous drive looping through the rest of Torres Del Paine National Park and towards Puerto Natales, we made a stop at some neolithic caves inhabited by the Ice Age Native Americans of the area. (Note that these caves are their own national park; they are not part of Torres del Paine.)

These ancient peoples hunted the giant sloth known as a Mylodon, similar in stature to the modern North American grizzly bear. Partial remains of Mylodon, including hair, bones, etc. were found in the cave and the majority can now be found in the British Museum in the UK. Replicas of the Mylodon and artifacts can be found in the cave museum onsite.

It is a short and easy walk into the cave. The cost is around $9 per person when converted into USD from Chilean Pesos. We were able to pay by credit card without issue.

This would be an easy place to visit with children.
At the end of this journey, we were sad to leave. Torres del Paine was beyond gorgeous. We were starting to think that maybe we should have done that 5-day hike after all.
So yes – this adventure was very, very worth it.
Itinerary
Hotel
Puerto Natales
AirBnB ($59/night) – We stayed at this charming, one-bedroom AirBnB with a fully equipped kitchen and washing machine. The wifi was strong and fast, especially after Ushuaia. It was an ideal place to get caught up on work and prepare for our hike.
Torres del Paine
We stayed at Refugio Chileno and Refugio Central in an equipped double tent. Book both as a single itinerary at Las Torres’ website.

Food
Puerto Natales
Wild Hostel – We liked this restaurant so much that we ate here twice. Try the burger or the potato/sausage/egg dish. Both are amazing. (If you also need a hostel, we admit the place looked very cute.)
Unimarc – The main grocery store. We prepared the rest of our meals at home and packed snacks with us to Torres del Paine.
Torres del Paine
The only option for food in the Base Torres area of Torres del Paine is to eat at a Refugio. The cuisine is unremarkable but delicious after a day of hiking.
There are a couple of cafes-slash-convenience stores in the town of Torres del Paine, which you’ll pass on your way to the park entrance and parking lot at Refugio Torre Central. We stopped at one for empanadas.
Transportation
By Car
We recommend contacting local car rental companies in Puerto Natales, Chile, for your Torres del Paine road trip. We had a great experience with Rental Car Magallanes.
Most bloggers will recommend that you use an aggregator like RentalCars.com to search for cars in Puerto Natales, but during the high season, you may not find any availability. We are also only able to see cars offered by Europcar, and they aren’t the best deal.
You’ll need to reach out to local car companies by finding them with Google and sending an email inquiry with your travel dates. Cars do book up during the high season; be prepared to either book months in advance of your trip or adjust your dates based on what the companies have available. We spent a couple of extra days in Puerto Natales in order to wait for a car.
Rental Car Magallanes was very communicative and provided us with a clean, well-maintained car. The woman who handled our reservation provided a thorough overview of the car and helpful directions for Torres del Paine park, noting where Google Maps’ time estimates were incorrect.
By Bus
If you’re doing the full W-Circuit trek or don’t want to rent a car, you can take Bus Sur from Puerto Natales to several locations in Torres del Paine. Schedules are available here.
There are 2-3 buses per day, so you must plan your route in advance. (We chose to rent a car because we wanted the ability to arrive and depart outside of the scheduled bus times.)
Bus Sur also offers transportation between Puerto Natales, Chile, Punta Arenas, Chile, and Ushuaia, Argentina.
We’d also like you to know that the Puerto Natales bus station has an amazing cat who quickly befriended us. If you’re in Puerto Natales and meet this cat, please send us a photo.

Currency
Chile uses the Chilean Peso. Credit Cards are widely accepted throughout Puerto Natales and Torres del Paine. Cash is not required for this route, but we found it helpful to have it in local restaurants where cash was preferred. There are multiple banks with ATMs in Puerto Natales.
Travel Tip of the Week
Let’s Recap
This email is long enough this week, so I’m just going to link to two things we’ve already talked about in our previous travel tips: our favorite raincoat (men’s version) and our favorite hiking shoes (men’s version). Both came in handy on this adventure.
If you enjoyed this newsletter, we’d love it if you would share us with your friends.
All our love,
Pete and Perry